Charge at Haritan: The Final Cavalry Clash of the Sinai and Palestine Campaign
The Charge at Haritan took place on October 26, 1918, serving as a dramatic and costly coda to the Sinai and Palestine Campaign of World War I. Occurring just days before the armistice, this engagement saw the 15th (Imperial Service) Cavalry Brigade attempt a bold strike against the retreating remnants of the Ottoman Empire's Yildirim Army Group north of Aleppo.
The battle was the culmination of a relentless pursuit. Following the decisive British victory at the Battle of Megiddo, Allied forces pushed north through Damascus, capturing thousands of prisoners and vast territories. Despite facing severe depletion due to sickness and stretched supply lines, the Desert Mounted Corps continued its advance toward Aleppo, supported by armored cars and the Sherifial Force led by Prince Faisal.
Key Facts
- Date: October 26, 1918.
- Location: Haritan, north of Aleppo, Ottoman Empire.
- Outcome: Ottoman victory (tactical repulse of the cavalry charge).
- Allied Forces: 15th (Imperial Service) Cavalry Brigade and armored car batteries.
- Ottoman Forces: Remnants of the Yildirim Army Group.
- Casualties: 21 dead and 56 wounded for the British Empire; at least 50 dead and 20 prisoners for the Ottoman Empire.
Strategic Background
The push toward Aleppo was encouraged by Sir Henry Wilson, Chief of the Imperial General Staff, who believed General Allenby's Egyptian Expeditionary Force (EEF) was capable of a daring cavalry raid. However, the logistics were daunting; Lieutenant-General Harry Chauvel's Desert Mounted Corps was operating 150 miles from its main supply base at Damascus, with Aleppo lying another 200 miles further north.
On the Ottoman side, the Yildirim Army Group was in a state of collapse. While thousands had retreated, only a fraction remained combat-effective. Nevertheless, by the time the Allied forces approached Aleppo, they faced a concentrated defensive effort led by commanders including Mustafa Kemal Pasha. The Turkish forces in the region grossly outnumbered the 5th Cavalry Division and its attached armored cars.
The Capture of Aleppo
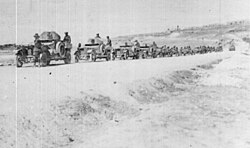
Major-General Henry Macandrew planned a three-pronged attack on Aleppo for October 26. Armored cars were to strike from the south, the 15th (Imperial Service) Cavalry Brigade would move west to cut the Alexandretta road, and Prince Faisal's Sherifial Force would attack from the east.
The city fell rapidly after a night of intense hand-to-hand street fighting conducted by the Sherifial Forces. By 10:00 AM on October 26, Macandrew and his armored cars entered the captured city.
The Battle of Haritan
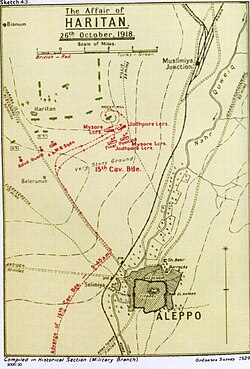
Following the fall of Aleppo, intelligence suggested that a Turkish force of 1,000 men with two artillery guns was retreating north. The 15th (Imperial Service) Cavalry Brigade was ordered to pursue. At 11:00 AM, the Jodhpur Lancers encountered Turkish small arms fire overlooking the town of Haritan.
The Charge
Brigadier Cyril Rodney Harbord ordered an immediate attack. The Mysore Lancers were tasked with flanking the ridge to the east and charging the village, while Jodhpur Lancer squadrons and machine-gun sections provided support. However, the operation was plagued by coordination failures:
- A mechanical fault in a leading armored car caused the rest of the No. 12 Light Armoured Motor Battery to withdraw, removing critical fire support.
- The Mysore Lancers found the Turkish line longer than anticipated, forcing them to move further east and out of range of their own supporting machine guns.
At 12:00 PM, the lancers launched their charge. While they successfully killed 50 enemy soldiers and captured 20 prisoners, they could not penetrate the main defenses. The Ottoman force was far larger than previously estimated, consisting of approximately 3,000 infantry, 400 cavalry, 12 artillery guns, and up to 40 machine guns.
The brigade was forced to withdraw and maintain observation. By midnight, the Turkish forces evacuated their positions, retreating 20 miles northwest to Deir el Jemel.
Aftermath and Armistice
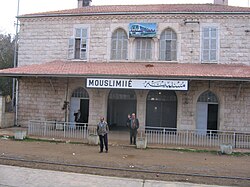
The 15th Brigade withdrew to Aleppo to resupply, while the 13th and 14th Brigades conducted further reconnaissance. On October 29, Sherifial Forces captured the Mouslimie Junction, a critical railway hub that severed Ottoman communications between Constantinople and Mesopotamia.
The pursuit ended shortly thereafter. On October 30, 1918, an armistice was signed on the battleship Agamemnon at Mudros, officially ending the fighting between the EEF and the Yildirim Army Group.
| Category | British Empire / Allied Forces | Ottoman Empire |
|---|---|---|
| Primary Units | 15th (Imperial Service) Cavalry Brigade | Yildirim Army Group Remnants |
| Key Commanders | Cyril Rodney Harbord | Mustafa Kemal Pasha |
| Personnel Losses | 21 dead, 56 wounded, 3 missing | At least 50 dead, 20 prisoners |
| Tactical Result | Forced to withdraw | Held position, then withdrew |
Frequently Asked Questions
Why is the Charge at Haritan considered an Ottoman victory?
Although the Ottomans eventually withdrew from the position, the charge itself was a tactical failure for the British Empire. The 15th Cavalry Brigade was unable to penetrate the Turkish defenses and was forced to retreat due to the superior numbers and firepower of the Ottoman defenders.
Who were the Mysore and Jodhpur Lancers?
These were regiments of the 15th (Imperial Service) Cavalry Brigade, consisting of Indian soldiers serving under the British Empire during World War I.
What role did armored cars play in the battle?
Armored cars were intended to provide mobile fire support and lead the advance. However, at Haritan, a mechanical failure in one vehicle led to a misunderstanding that resulted in the entire battery withdrawing from the attack, leaving the cavalry without necessary cover.
How did the battle end?
The battle ended with a tactical stalemate followed by a Turkish withdrawal. The Ottoman forces evacuated Haritan by midnight on October 26, moving further north to Deir el Jemel.
What was the strategic significance of the Mouslimie Junction?
The capture of the Mouslimie Junction by Sherifial Forces on October 29 was highly significant because it cut the railway communications between the Ottoman capital, Constantinople, and their forces in Mesopotamia.