Battle of Doornkop: The Strategic Push Toward Johannesburg
The Battle of Doornkop, fought between May 28 and May 30, 1900, served as a pivotal engagement during the Second Boer War. As part of Lord Roberts' strategic advance toward Pretoria, this clash marked the final major obstacle before the British forces could secure the capture of Johannesburg.
The engagement took place on the western boundary of Johannesburg, centered around a ridge known as Doornkop. This location held significant historical weight, having previously been the site where the Jameson Raid was halted in 1896. By 1900, it became the scene of the final battle leading to the surrender of the city.
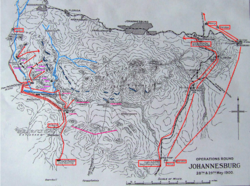
Key Facts
- Date: May 28–30, 1900
- Location: Doornkop, Transvaal, South Africa
- Outcome: British victory
- British Strength: 5,000+ troops
- Boer Strength: 2,000+ troops
- British Casualties: 130 killed, wounded, and captured
Strategic Background and Maneuvers
Following a victory at the Battle of Paardeberg, Lord Roberts aimed to capture the capital cities of Johannesburg and Pretoria to force a Boer surrender. However, the British army faced a formidable natural barrier: the Klipriversberg Range, where Boer forces had established a strong defensive position at Doornkop.
Roberts implemented a two-pronged offensive strategy. Lieutenant-General French and Lieutenant-General Hamilton led columns to the west of Johannesburg, while Major-General Tucker and Major-General Pole-Carew commanded the main force advancing along the railway line to the east.
On May 28, French's column crossed the Klip River but was halted by heavy Boer bombardment. To overcome this, Hamilton moved further west to execute a flanking movement. The British utilized superior firepower, deploying over 30 guns against the Boer positions. The Boers, meanwhile, utilized the Long Tom Gun, a heavy piece of artillery previously famous for its role at Mafeking.
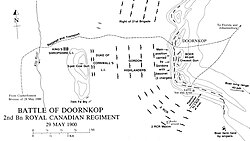
The Assault on Doornkop
By May 29, the Boer line of defense was extended and weakened, as some troops had been diverted to prevent the British from cutting off the retreat to Pretoria. This vulnerability allowed the British to launch a full-frontal attack led by Hamilton's two infantry brigades.
The Role of the Gordon Highlanders
The Gordon Highlanders led the advance with machine-like precision. To hinder the British, the Boers set fire to the veld (open grassland), creating a backdrop of smoke and flames. Despite the visibility and the intense rifle fire that erupted when they were within 800 yards, the Highlanders pushed forward, charging the Boer positions behind rocky cover.
Canadian Contributions
Canadian forces played a critical tactical role. The Canadian Mounted Rifles and the Royal Canadian Dragoons remained behind for three hours, drawing Boer fire to distract them from the southern flanking maneuver. Once the diversion was complete, the 2nd Battalion, Royal Canadian Regiment of Infantry, advanced up a long slope through burning brush and smoke. Utilizing their battalion machine gun section and clever use of terrain, they captured their objective with only seven men wounded.
Aftermath and Legacy
The victory at Doornkop came at a high cost for the Gordon Highlanders. Reports indicate they lost approximately 100 men in just ten minutes, with 19 killed and 78 wounded. In contrast, the Canadian and C.I.V. (Canadian Imperial Volunteers) units suffered lighter losses.
The bravery of the troops was widely recognized. Corporal F. Mackay was awarded the Victoria Cross for dressing the wounds of his comrades and carrying a man to safety under heavy fire. Winston Churchill, reporting for the Morning Post, praised the Gordon Highlanders as the "finest regiment in the world."
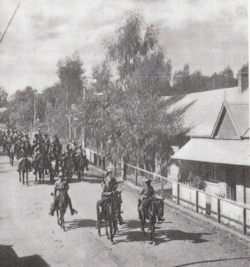
The victory cleared the path for the British to enter Johannesburg on May 31 and Pretoria on June 5. While the capitals fell, the conflict did not end; the Boers transitioned to a guerrilla war that continued for nearly two more years.
Battle Summary
| Category | British Empire (UK & Canada) | South African Republic (Boers) |
|---|---|---|
| Commanders | Roberts, French, Hamilton | Botha, de la Rey |
| Troop Strength | 5,000+ | 2,000+ |
| Key Artillery | 30+ Guns | Long Tom Gun |
| Casualties | 130 total | Not definitively recorded |
| Outcome | Victory | Defeat |
Frequently Asked Questions
What was the primary objective of the Battle of Doornkop?
The primary objective was to clear the Boer defensive positions on the Doornkop ridge, which blocked the British advance toward the capital cities of Johannesburg and Pretoria.
How did the Boers attempt to stop the British advance?
The Boers used the natural advantage of the Klipriversberg Range, heavy artillery including the Long Tom Gun, and the tactical decision to set fire to the veld (grassland) to obscure the British advance and create chaos.
What role did Canadian forces play in the battle?
Canadian units provided vital support by acting as a diversion to draw Boer fire away from flanking maneuvers and by successfully capturing their objectives through burning brush with minimal casualties.
Who was awarded the Victoria Cross during this battle?
Corporal F. Mackay received the Victoria Cross for his conspicuous bravery in treating wounded comrades and carrying a man to safety while under heavy enemy fire.
Did the victory at Doornkop end the Second Boer War?
No. While it led to the capture of Johannesburg and Pretoria, the Boers did not surrender and instead continued a guerrilla war for nearly two more years.