Second Boer War Artillery Tactics and the Creeping Barrage
During the Second Boer War, the British military attempted to utilize heavy bombardment as a primary alternative to ground assaults. The goal was to neutralize enemy positions from a distance, reducing the need for risky infantry charges. However, this strategy frequently clashed with the Boers' superior use of cover and evasive maneuvers, which allowed them to hide their positions and protect their troops from shelling.
Key Facts
- The British initially struggled with artillery due to poor intelligence and the Boers' use of concealed trenches.
- Smokeless powder made it difficult for British forces to locate Boer firing positions.
- The 4.7-inch naval gun, nicknamed 'Joe Chamberlain', was used at Magersfontein but failed to hit the enemy.
- The creeping barrage—a tactic of continuous shell fire moving ahead of advancing troops—was described as "revolutionary."
- Success was achieved only when artillery was integrated with infantry movements rather than used in isolation.
Early Failures in Bombardment
The Battle of Magersfontein (December 11, 1899)
At Magersfontein, the British deployed a significant arsenal, including twenty-four field guns, four howitzers, and a 4.7-inch naval gun known as 'Joe Chamberlain'. Naval gunners claimed 'Old Joey' could eliminate every man within 150 yards of a shell's impact. Despite this power, the bombardment failed because the British lacked accurate intelligence; while they shelled the hill, the Boers were actually positioned in a line of trenches nearby. The Boers did not evacuate for another three months, and they did so because the British bypassed them, not because of the artillery.
The Battle of Colenso (December 15, 1899)
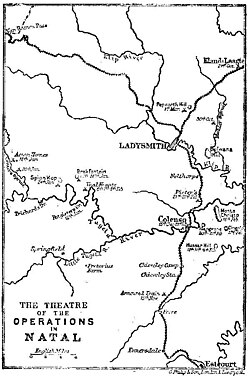
The British faced similar intelligence failures at Colenso. The Boers remained hidden, making it impossible for the British to estimate their numbers or exact locations. Two factors specifically hindered the British: the use of smokeless fire, which left no visual trail to the shooters, and the practice of concealing guns behind emplacements—a tactical innovation in late nineteenth-century warfare.
The Evolution of the Creeping Barrage
The Relief of Ladysmith (February 14–28, 1900)
The tide turned when General Buller stopped relying on artillery as a standalone tool and began coordinating it with infantry. He implemented a system of continuous interlocking assaults on the hills south of Ladysmith, where infantry moved forward immediately after shelling ceased in a specific area.
The breakthrough occurred on February 27 through the use of a creeping barrage—a curtain of shell fire sent over the heads of advancing infantry to destroy everything approximately 100 yards ahead of them. This tactical shift is regarded by historian Pakenham as "revolutionary" because it provided a protective shield for the soldiers as they advanced.
Summary of Key Engagements
| Battle | Date | Primary Tactic | Outcome |
|---|---|---|---|
| Magersfontein | Dec 11, 1899 | Static Bombardment | Failure due to poor intelligence |
| Colenso | Dec 15, 1899 | Static Bombardment | Failure due to smokeless fire and cover |
| Relief of Ladysmith | Feb 14–28, 1900 | Creeping Barrage | Success through infantry coordination |
Frequently Asked Questions
What is a creeping barrage?
A creeping barrage is a military tactic where artillery fire is coordinated to move forward in a "curtain" or line, staying just ahead of advancing infantry to suppress the enemy and clear the path for the soldiers.
Why did the bombardment fail at the Battle of Magersfontein?
The bombardment failed because of poor intelligence. The British targeted a hill, but the Boer forces were actually positioned in trenches close to the hill, remaining safe from the shells.
How did smokeless fire affect the Battle of Colenso?
Smokeless fire prevented the British from seeing the clouds of smoke typically produced by gunpowder, making it extremely difficult to locate and target the hidden Boer positions.
Who was 'Joe Chamberlain' in the context of the war?
'Joe Chamberlain' was the nickname given to a 4.7-inch naval gun used by the British, named in honor of the British Colonial Secretary.
What was the key to General Buller's success at Ladysmith?
General Buller's success came from integrating artillery with infantry movements, creating interlocking assaults and eventually utilizing the creeping barrage to collapse the enemy front.