Battle of Modder River
The Battle of Modder River, fought on November 28, 1899, stands as a pivotal engagement of the Second Boer War. Occurring near the confluence of the Modder and Riet Rivers in the Cape Colony, the battle pitted the British Empire against the forces of the South African Republic and the Orange Free State. While technically a British victory, the engagement revealed a lethal evolution in defensive warfare that would haunt British forces for months to come.
Key Facts
- Date: November 28, 1899
- Outcome: British victory, though with heavy casualties.
- British Commander: Lord Methuen
- Boer Commanders: Piet Cronjé, Koos de la Rey, Naas Ferreira, and Petrus Liebenberg
- Tactical Shift: First major use of concealed trenches by Boer forces to negate British artillery and infantry charges.
- Strategic Goal: The British aimed to relieve the besieged diamond-mining center of Kimberley.
Strategic Background
At the onset of the war, Boer forces surrounded Kimberley, a critical diamond-mining hub located where the borders of the Transvaal, the Orange Free State, and the British-controlled Cape Colony converged. While the Boers did not immediately assault the town, their presence created a strategic crisis for the British.
General Sir Redvers Buller dispatched the 1st Division, led by Lieutenant General Lord Methuen, to break the siege. The mission was driven by both military necessity and prestige, as rescuing the town—and the prominent Imperialist Cecil Rhodes—would provide a significant propaganda victory for the United Kingdom.
Throughout November, Methuen advanced north along the Western Cape Railway, securing victories at the Battle of Belmont and Graspan. Among the British ranks was Lance Corporal Hollon Bush of the Coldstream Guards, an American who had traveled from New Orleans to England before serving in Gibraltar and South Africa.
The Boer Tactical Revolution
Historically, Boer forces occupied kopjes (small hills), which made them easy targets for British artillery and left them vulnerable to bayonet charges once infantry reached the summit. General Koos de la Rey proposed a radical departure from this tradition.
Leveraging the flat trajectory of the Mauser rifle and the open terrain of the veld (open grassland), De la Rey ordered his men to dig trenches into the banks of the Modder River. This allowed the Boers to remain concealed while sweeping the open plain with lethal fire. General Piet Cronjé eventually adopted this novel plan.
The Boers further optimized their defense by dispersing their artillery—including six field guns and a Maxim "pom-pom" (a small, rapid-firing gun)—into individual detachments. By digging multiple emplacements for each gun, they could shift positions to avoid British counter-battery fire.
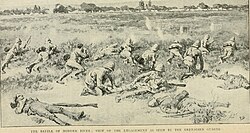
The Engagement: November 28, 1899
Lord Methuen's force comprised two infantry brigades (the Guards Brigade and the 9th Brigade), two mounted regiments, and several artillery batteries, including the Naval Brigade. Despite scouting efforts by the 9th Lancers and Rimington's Guides, the British failed to detect the Boer trenches, which were cleverly hidden and marked by whitewashed stones and biscuit tins for range-finding.
The British advance began at 4:30 am with the simple goal of crossing the river. However, as they came within 1,200 yards of the bank, the Boers opened fire. The British infantry, caught in the open with no cover, were forced to lie prone on the veld for hours, enduring extreme heat and thirst.
The British artillery pounded the buildings of Modder River Station and a line of poplar trees, entirely missing the concealed trenches on the south bank. The battle devolved into a day-long stalemate. Lord Methuen, attempting to rally the advance, was wounded in the process.
The Breakthrough at Rosmead
Around midday, elements of the 9th Brigade discovered an open Boer flank at the Rosmead drift (a shallow river crossing). British troops infiltrated the ford and captured Rosmead by 1:00 pm. However, the victory was disjointed; the 62nd Battery of British field artillery accidentally shelled their own men. By nightfall, Boer forces had pushed the British back into a precarious bridgehead.
Despite the local setback, the Boers feared they were being outflanked and withdrew under the cover of darkness.
Aftermath and Legacy
Lord Methuen described the engagement as one of the hardest fights in the history of the British army. The battle proved that frontal infantry assaults against bolt-action rifles and entrenched positions were effectively impossible.
The British were forced to halt for ten days to evacuate wounded soldiers and repair communications. This delay provided the Boers with the necessary time to construct the extensive entrenchments used later at the Battle of Magersfontein.
| Category | United Kingdom | Boer Republics |
|---|---|---|
| Strength | 8,000 troops, 20 guns | 2,200–3,500 troops, 6 field guns, 2 pom-poms |
| Casualties | 71 killed, 400+ wounded, 7 missing | ~75–150 killed or wounded |
| Key Leaders | Lord Methuen | Piet Cronjé, Koos de la Rey |
| Result | Tactical Victory | Strategic Withdrawal |
Frequently Asked Questions
Why is the Battle of Modder River significant?
It marked a shift in Boer tactics from occupying hills (kopjes) to using concealed trenches, which neutralized the British advantage in artillery and forced a change in British infantry approach.
Who was the primary architect of the Boer defense?
General Koos de la Rey proposed the use of trenches and the flat trajectory of the Mauser rifle to defend the veld, a plan later supported by General Piet Cronjé.
What was the British objective during this battle?
The British force under Lord Methuen was attempting to advance north to relieve the Siege of Kimberley.
How did the British eventually force a Boer retreat?
While the frontal attack failed, British infantry managed to cross the Rosmead drift and threaten the Boer right flank, leading the Boers to withdraw during the night to avoid being surrounded.
What were the consequences of the ten-day British delay following the battle?
The pause allowed the British to reorganize, but it gave the Boers critical time to build the fortifications they would use to defend Magersfontein.